Friday, July 17, 2009

Exchange 2007- Mapi session exceeded the maximum of 32 objects of type "session"

Two days back i faced a strange issue from one of the user that he is not able to open his outlook. Although he can open his OWA but whenever he open his outlook he is getting following error

“Unable to open your default e-mail folders. You must connect to your Microsoft Exchange Server computer with the current profile before you can synchronize your folders with the offline folder file”

After further investigation i found that there is an event logged in the application events of the mailbox server for the same user

Event Type:      Error
Event Source:      MSExchangeIS
Event Category:      General
Event ID:      9646
Date:            XXXXX
Time:           XXXXX
User:            N/A
Computer:      XXXXX
Description:
Mapi session "/o=firstorganisation=XXXX/cn=Recipients/cn=username" exceeded the maximum of 32 objects of type "session".

After researching i found following KB on the same issue

http://support.microsoft.com/kb/842022

As per this KB this issue may occur if the following conditions are true:

  • You have installed Microsoft Exchange Server 2003 Service Pack 1 (SP1) on the Exchange Server computer.
  • A program that is running on a client computer opens many MAPI sessions to the Exchange Server computer. The number of MAPI sessions is larger than the permitted limit.
  • You are using Microsoft Office Outlook 2007, and you add a large additional mailbox to your profile. For example, this issue may occur if the additional mailbox contains more than one thousand folders.

I am unable to found any of the above condition in my case. Also fixes mentioned in this article is not relevant to my case except the last registry change which i don't want to apply for one user.

Then i decided to view the connections on the mailbox server. I downloaded TCP view utility from sysinternals (one of the best sites for troubleshooting tools). After running TCP view i have seen lots of connections coming to mailbox server but the user name which i was searching was not visible in the list of connections, then i ran following command on exchange management shell for finding out the source IP of the user having problem

Get-logonstatistics username | FT ClientIPAddress

After viewing the IP Address i searched the IP address in the TCP View and was able to found lots of connections coming from the same IP, i killed these sessions by using Kill option in TCP view and then again tried to open the outlook and the issue gone !!!!  I have also informed the user to have a look on his PC for checking if there is any third party software or any other MAPI program which is causing this issue for having a permanent fix for this.
Friday, July 10, 2009

Storage in Exchange 2010: Webcast

Join the new webcast on exchange 2010 storage technology planned to be delivered on July 13 2009. Following is the registration link

http://msevents.microsoft.com/CUI/WebCastEventDetails.aspx?EventID=1032418920&EventCategory=4&culture=en-US&CountryCode=US

Exchange 2010 updates for Windows Mobile

During some researching i found an interesting video on Exchange 2010 mobile features and thought worth to blog. As per this video introduction


Adam Glick shows us the newest Exchange 2010 features for Windows Mobile 6.1/6.5 and explains the goals the team had for the client mobile experience. On his WM 6.5 device, he walks us through conversation view, ignore/move conversation, voice mail preview, voice to text, and get free/busy. Additionally, he tells us about the new allow/block/quarantine phone list and reporting built in to Exchange 2010.


Check out this video on following link

http://edge.technet.com/Media/Exchange-2010-updates-for-Windows-Mobile/

Monday, July 6, 2009

Publishing Exchange 2007 OWA via ISA 2006 Reverse Proxy

The best way to publish OWA is to publish via ISA reverse proxy deployment. In this blog i will discuss the process for publishing OWA via ISA reverse proxy. The process will be like this;

1. Generate CSR for Exchange 2007 CAS server(s).

I have discussed CSR generation in my previous blogs (http://khurramullah.wordpress.com/2009/07/01/exchange-2007-certificate-request-generator/ and http://khurramullah.wordpress.com/2009/07/01/command-for-generating-csr-for-exchange-servers/) if you have more than one CAS servers then you have to repeat the steps for all of them.

Make sure you have included all Subject Alternative  Names (SANs) in your certificate requests such as for webmail, auto discover services etc.

2. Submit this request to online Certificate Authorities such as VeriSign, Thwate or Entrust for purchasing UCC (Unified communication certificate). (Exchange 2007 only supports UCC type certificates, UCC=multiple SANs).

3. Now we have to import these certificates to Exchange CAS servers.( I have discussed these steps in my previous blog http://khurramullah.wordpress.com/2009/07/01/importing-certificates-to-exchange-servers/)

4. Now we have to deploy this certificate to ISA servers. In order to do this you have to first Export certificate from CAS server in .PFX format and then imports it to the ISA servers. Following is the process for doing this;

  1. Open Certificate MMC Snap in on the CAS server for local computer.
  2. Go to personal container and locate the certificate which you want to Deploy on ISA Server.
  3. Export this certificate with private key in .PFX format.
  4. Copy this certificate on ISA Server.
  5. Open Certificate MMC Snap in on the ISA server for local computer.
  6. Import the copied certificate.
  7. Repeat steps 4 to 7 if you have more than one ISA Servers.

5. Forms-based authentication can be configured on the Client Access server when not using ISA Server to publish Exchange Web client access. When ISA Server is being used to publish Exchange Web client access, forms-based authentication should only be configured on the ISA Server computer following are the steps for validating this;

  1. Start the Exchange Management Console.
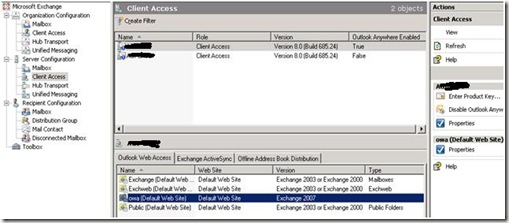
  2. In the Exchange Management Console, expand Server Configuration, and then click Client Access.
  3. Select a Client Access server and then select owa (Default Web Site) on the Outlook Web Access page.OWA5
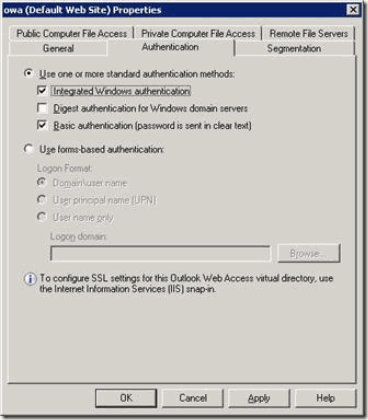
  4. In the action pane, click Properties under owa (Default Web Site).
  5. Select the Authentication page, and confirm that the following are selected: Use one or more of the following standard authentication methods and Integrated + Basic authentication (password is sent in clear text).clip_image001
  6. Click OK.
  7. Review the Microsoft Exchange Warning dialog box and click OK. clip_image001[6]
  8. Restart IIS by running following command: "iisreset /noforce".
  9. Perform this procedure for every Exchange Client Access server.

6. On the CAS server please make sure that “Forms based authentication” is not configured on the Exchange Client Access Activesync folder. By default it is configured for basic authentication.This folder is configured to Basic authentication by default.

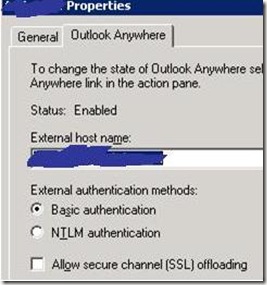
7. On the enabling page for Outlook Anywhere, we will use Basic authentication (default).

OWA1

Note: The external host name used here should match the common name or FQDN used in the server certificate installed on the ISA Server computer

8. Now we need to publish a Rule for OWA on ISA but before doing this we need to configure web Listener for OWA which will be responsible for  listening OWA requests, following are the steps for configuring web listener for OWA

  1. In the console tree of ISA Server Management, click Firewall Policy:
  2. For ISA Server 2006 Standard Edition, expand Microsoft Internet Security and Acceleration Server 2006, expand Server_Name, and then click Firewall Policy.
  3. For ISA Server 2006 Enterprise Edition, expand Microsoft Internet Security and Acceleration Server 2006, expand Arrays, expand Array_Name, and then click Firewall Policy.
  4. On the Toolbox tab, click Network Objects, click New, and then select Web Listener. Use the wizard to create the Web listener as outlined in the following table

Page

Field or property

Setting

Welcome

Web listener name

Type a name for the Web listener. For example, type Exchange Web Listener.

Client Connection Security

Select what type of connections this Web listener will establish with clients

Select Require SSL secured connections with clients.

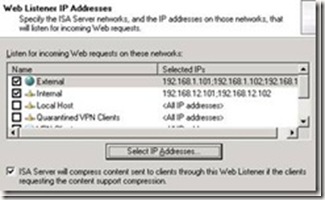
Web Listener IP Addresses

Listen for incoming Web requests on these networks

ISA Server will compress content

Select the External and Internal networks.

Check box should be selected (default).

Click Select IP Addresses

External Network Listener IP Selection

Listen for requests on

Available IP Addresses

Select Specified IP addresses on the ISA Server computer in the selected network.

Select the correct IP address and click Add.

clip_image001

clip_image002  Notes

For ISA Server Enterprise Edition with an NLB-enabled array, you should select a virtual IP address.

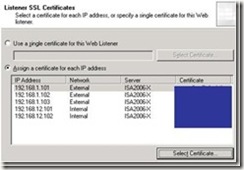
Listener SSL Certificates

Select a certificate for each IP address, or specify a single certificate for this Web listener

Select Assign a certificate for each IP address.

Select the IP address you just selected and click Select Certificate.

Choose the certificate corresponding to the url mapped to this IP in the public DNS/NAT configuration

Example:

External 192.168.1.101 for abcmail; .102 for xyzmail and .103 for autodiscover

Internal: 192.168.12.101 for abcmail; .102 for xyzmail (autodiscover is resolved differently in intranet)

clip_image003

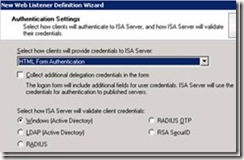
Authentication Settings

Select how clients will provide credentials to ISA Server

Select how ISA Server will validate client credentials

Select HTML Form Authentication for forms-based authentication and select the appropriate method that ISA Server will use to validate the client's credentials.

clip_image004

Single Sign On Settings

Enable SSO for Web sites published with this Web listener

SSO domain name

Leave the default setting to enable SSO.

To enable SSO between two published sites, such as abcmail.Contoso.com and autodiscover.Constoso.com, type .Contoso.com (with the dot)

clip_image005[1]

Completing the New Web Listener Wizard

Completing the New Web Listener Wizard

Review the selected settings and click Back to make changes or Finish to complete the wizard.


9.  Now after creating web Listener we need to publish a rule for OWA, following are the steps for this process;

  1. In the console tree of ISA Server Management, click Firewall Policy:
  2. For ISA Server 2006 Enterprise Edition, expand Microsoft Internet Security and Acceleration Server 2006, expand Arrays, expand Array_Name, and then click Firewall Policy.
  3. On the Tasks tab, click Exchange Web Client Access Publishing rule.image
  4. Use the wizard to create the rule as outlined in the following tables. For a single Web server, use the table in New Exchange Publishing Rule wizard for a single Web site. If you are using a server farm, use the table in New Exchange Publishing Rule wizard for a server farm.

    Page

    Field or property

    Setting

    Welcome

    Exchange Publishing rule name

    Type a name for the rule. For example Constoso OWA Publishing Rule

    Select Services

    Exchange version

    Web client mail services

    Select Exchange Server 2007.

    Select the desired access method – begin with OWA, then Outlook Anywhere (Select to publish additional folders) and finally choose ActiveSync

    clip_image001[8]

    Publishing Type

    Select if this rule will publish a single Web site or external load balancer, a Web server farm, or multiple Web sites

    Select Publish a single Web site or load balancer.

    clip_image002[11]

    Server Connection Security

    Choose the type of connections ISA Server will establish with the published Web server or server farm

    Select Use SSL to connect to the published Web server or server farm.

    clip_image003[1]  Note

    A server certificate must be installed on the published Exchange Client Access server, and the root CA certificate of the CA that issued the server certificate on the Exchange Client Access server must be installed on the ISA Server computer.

    Internal Publishing Details

    Internal site name

    Type abc.contoso.com or whatever you like

    clip_image004  Important

    The internal site name must match the name of the server certificate that is installed on the internal Exchange Client Access server.

    Public Name Details

    Accept requests for

    Public name

    This domain name (type below)

    Type the domain name that you want ISA Server to accept the connection for. For example, type abc.contoso.com. This must match the FQDN of the certificate selected when creating the Web listener.

    clip_image005[3]

    Select Web Listener

    Web listener

    Select the Web listener you created previously, Exchange Web Listener

    Authentication Delegation

    Select the method used by ISA Server to authenticate to the published Web server

    For Outlook Web Access, select Basic Authentication.

    For Exchange ActiveSync, select Basic Authentication

    For Outlook Anywhere, select Basic Authentication

    clip_image006[6]

    User Sets

    This rule applies to requests from the following user sets

    Select the user set approved to access this rule. Replace the default All Authenticated users with All Users

    clip_image007[5]

    Pass the warning

    clip_image008[4]

    Completing the New Exchange Publishing Rule Wizard

    Completing the New Exchange Publishing Wizard.

    Review the selected settings, click Back to make changes or Finish to complete the wizard.

    Note: When publishing Outlook Web Access, after you click Finish, review the Remaining Exchange Publishing Tasks dialog box, and then click OK.

  5. In the path tab (properties of the OWA rule), add the path “/” in order to be able to access OWA without typing /owa at the end of the url


Saturday, July 4, 2009

Microsoft Antigen for Exchange

If you wan to try Microsoft Antigen for Exchange before purchasing it then here is your link

http://www.microsoft.com/downloads/details.aspx?displaylang=en&FamilyID=866b63bf-6207-4197-9c5d-511b7212e40c

You can download this trial version and test it for free.

TechNet for Exchange 2010

If you have installed exchange 2010 and wants help on some features or stuck in some issue and wants to fix it, then don't worry there is a separate TechNet website dedicated for this purpose and contains plethora of information on exchange 2010, check it out

http://technet.microsoft.com/en-us/exchange/2010/default.aspx

Exchange 2010 Beta for Download

Wants to try Exchange 2010 ? why wait, now Microsoft has published exchange 2010 beta on their website for downloading and using for 360 days, Following is the link;

http://technet.microsoft.com/en-us/evalcenter/dd185495.aspx

Note: Exchange 2010 Beta can only run on 64 bit machines.

Exchange 2010 Virtual Lab

Good news for all of those who wants to see and experience what is exchange 2010 look like. Below is the link of one of the virtual labs in exchange 2010 series

Exchange Server 2010 (Beta) Setup and Deployment Virtual Lab

http://msevents.microsoft.com/CUI/WebCastEventDetails.aspx?EventID=1032419057&EventCategory=3&culture=en-US&CountryCode=US

Wednesday, July 1, 2009

Importing Certificates to Exchange 2007 servers

In my previous blogs (http://khurramullah.wordpress.com/2009/07/01/command-for-generating-csr-for-exchange-servers/ and http://khurramullah.wordpress.com/2009/07/01/exchange-2007-certificate-request-generator/) i have discussed how we can generate CSR for different exchange roles. Here i will discuss how we can import certificates to different exchange roles. Following is the command for importing certificates;

Import-ExchangeCertificate -Path “c:\path\generated SAN certif_name.cer” –friendlyname “<Certificate Friendly Name>”

After running this command successfully you should be seeing the thumbprint of the new certificate. Copy the full thumbprint value because you will required this in the next commands.

Now you have to enable your certificate for specific services for example for SMTP and Web services.

For enabling CAS server certificates run this command:

Get-exchangecertificate <Thumbprint>| enable-exchangecertificate -services "IIS”


For enabling Edge server certificates run this command

Get-exchangecertificate <Thumbprint>| enable-exchangecertificate -services "SMTP”

After running above command run Get-exchangecertificate again for verifying if services are enabled or not.

You can also combine the above 2 commands like this;

Import-ExchangeCertificate -Path “c:\path\generated SAN certif_name.cer” –friendlyname “<Certificate Friendly Name>” | enable-exchangecertificate -services "IIS”

Following are the possible values for services parameter;

  • IMAP
  • POP
  • UM
  • IIS
  • SMTP
  • None

Do not import exchange certificate by normal certificate importing methods (import from certificate MMC Snap in) otherwise certificate will not going to work. Also make sure you have Trusted root CA and Intermediate CA certificates installed in their relevant stores otherwise certificate will have issues.

In case you want to import or apply the same certificate to another Edge or CAS server then you need to perform following addition steps;

1. Open Certificate MMC Snap in on the server for local computer.

2. Go to personal container and locate the certificate which you had just imported.

3. Export this certificate with private key.

5. Copy this certificate on the server where you want to configure this certificate.

6. Run following command on the second server which you want to configure from the same certificate;

Import-ExchangeCertificate -Path c:\path\<certificate file>.pfx –Password:(Get-Credential).password

The Get-Credential cmdlet in the above command pops up a standard username\password dialog box. This is little bit confusing because we don't need a username to get to the keys, just put whatever you want for the username, but put the password that you used when you ran the Export certificate wizard the Certificate Manager snap-in in MMC.

7. Run command Get-ExchangeCertificate to get the thumbprint of this certificate.

8. Run command EnableCertificate –thumbprint <copy the thumbprint> -services “IIS”

9. After running above command run Get-exchangecertificate again for verifying if services are enabled or not.

Command for Generating CSR for Exchange servers

During Edge server configuration, you are required to bind a certificate to edge server for securing edge server communication. For this you have to run a powershell command which will generate a required CSR for you ( I have discussed a tool for CSR generation in my previous blog http://khurramullah.wordpress.com/2009/07/01/exchange-2007-certificate-request-generator/). Here in this blog i will discuss the powershell command for CSR generation. A typical command will be like this

New-ExchangeCertificate -GenerateRequest -Path c:\Server1_Contoso_com.csr -KeySize 1024 -SubjectName "c=SG, s=, l=Singapore, o=Fictious Enterprise, ou=Information Technology, cn=Server1.Contoso.com"  -PrivateKeyExportable $True


There are some important parameters in this command which i will discuss below

Path: The path where the CSR file will save.

KeySize: possible values are 1024, 2048.

Subject Name: Subject name consists of different parameters which are;

c=Country, c=State, I=City, o= organization, ou=organization unit or department, cn=common name (for example the public name of your website)


PrivateKeyExportable: This will mark the key as exportable so you can backup it and deploy it to another server if required.

Exchange 2007 Certificate Request Generator

Generating CSR for any exchange 2007 role is little bit tricky and required a quite long Powershell command to run. For making it lot simpler a company named as digicert has published a free tool on internet which is accepting different parameters and provide us a powershell command which we can run and generate CSR for any server role, Following is the link of this tool;

DigiCert's Exchange 2007 CSR generation Tool

https://www.digicert.com/easy-csr/exchange2007.htm

Monday, June 22, 2009

Disabling Message Subject Logging

Message Subject logging is by default enabled in Message Tracking Logging. You might need to disable Message subject logging as part of compliance and Security requirements, in order to achieve this you have to run following command

Note: Before you enable or disable message subject logging, make sure that you verify your organization's policy about revealing subject line information.

Set-TransportServer <ServerName> -MessageTrackingLogSubjectLoggingEnabled $false

Changing Exchange server Queues and Logs directory Location

When you install Exchange 2007 Edge or Hub Transport Role, by default Exchange setup configures Queues, Replay, Pickup and Transport logs directory on C:\Program Files\Microsoft\Exchange Server Folder. In an enterprise environment where you have high volume of emails coming in and out it is good to have separate drive for these folders . Following are the steps for changing the these folders default location

Old Queues, Replay, Pickup and Transport logs directory: C:\Program Files\Microsoft\Exchange Server

New Queues, Replay, Pickup and Transport logs directory: F:\Exchange


Configuration steps for Queue Directory:

1. Create the following directory: F:\Exchange\Queue

Permissions Required for the Directory:

Administrator: Full Control

System: Full Control

Network Service: Full Control


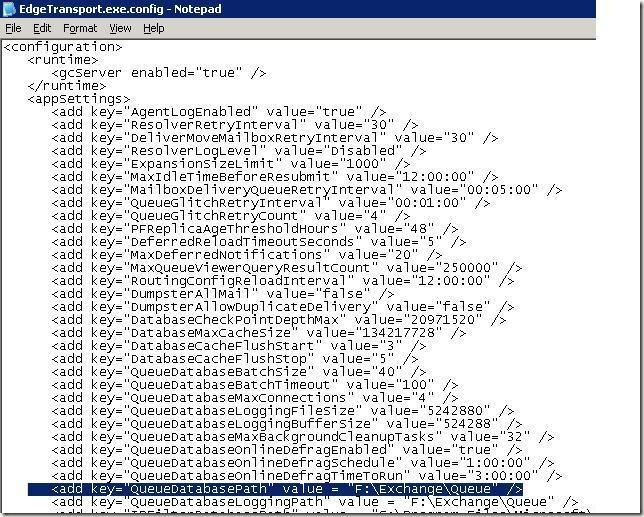
2.  Open the following file by using Notepad:

 C:\Program Files\Microsoft\Exchange Server\Bin\EdgeTransport.exe.config


3. .Modify the following line in the <appSettings> section:

<add key="QueueDatabasePath" value=" F:\Exchange\Queue " />

And

<add key="QueueDatabaseLoggingPath" value=" F:\Exchange\Queue " />

EdgeTransport

4. Save and close the EdgeTransport.exe.config file.

5.Restart the Microsoft Exchange Transport service.

(Make sure you have also added the same set of accounts with the same permissions on F:\Exchange folder otherwise Microsoft exchange Transport service will not start.)


Configuration steps for Pickup Directory:

1. Open Exchange Management Shell.

2. Run following commands
Set-TransportServer <ServerName> –PickupDirectoryPath "F:\Exchange\Pickup"

Permissions Required for Pickup Directory

Administrator: Full Control

System: Full Control

Network Service: Read, Write, and Delete Subfolders and File

Configuration steps for Replay Directory:

1. Open Exchange Management Shell.

2. Run following commands
Set-TransportServer <ServerName> -ReplayDirectoryPath "F:\Exchange\Replay”

Permissions Required for Replay Directory

Administrator: Full Control

System: Full Control

Network Service: Read, Write, and Delete Subfolders and File


Configuration steps for Transport Logs-Connectivity Logs Directory:

1. To change the location of connectivity logs run following commands
Set-TransportServer <ServerName> -ConnectivityLogPath "F:\Exchange\Logs\Connectivity"

Permissions Required for Directory

Administrator: Full Control

System: Full Control

Network Service: Read, Write, and Delete Subfolders and File

Configuration steps for Transport Logs-Protocol Logs Directory:

1. To change the location of Send Protocol Logs run following commands
Set-TransportServer <ServerName> -SendProtocolLogPath "F:\Exchange\Logs\ProtocolLog\SmtpSend"

2. To change the location of Receive Protocol Logs run following commands
Set-TransportServer <ServerName> -ReceiveProtocolLogPath "F:\Exchange\Logs\ProtocolLog\SmtpReceive"

Permissions Required for Directory

Administrator: Full Control

System: Full Control

Network Service: Read, Write, and Delete Subfolders and File


Configuration steps for Transport Logs-Routing Table Logs Directory:

1. To change the location of Routing Table Logs run following commands
Set-TransportServer <server name> -RoutingTableLogPath "F:\Exchange\Logs\Routing"

Permissions Required for Directory

Administrator: Full Control

System: Full Control

Network Service: Read, Write, and Delete Subfolders and File


Configuration steps for Transport Logs-Message Tracking Directory:

1. To change the location of Messaging Tracking Logs run following commands
Set-TransportServer <ServerName> -MessageTrackingLogPath " F:\Exchange \logs\MessageTracking"

Note: You might need to disable Message subject logging as part of compliance requirement, in order to achieve this you have to run following command

Set-TransportServer <ServerName> -MessageTrackingLogSubjectLoggingEnabled $false

Permissions Required for Directory

Administrator: Full Control

System: Full Control

Network Service: Read, Write, and Delete Subfolders and File

PowerShell Script for getting list of users having no Default Quota Set

In a big exchange environment having more than 5000 users, it is hard to control Mailbox quota limit, you continuously gets pressure from the executive and top management for increasing their Mailbox quota and it is very hard to control that who has the default quota limit and who has not. Following commands can help in these type of situations by simplifying reporting and giving a list of users having no default quota set. The results from this command can be used for identifying the possible users who no longer need customized quota and should be configured back to default quota for ease of maintenance

Get-Mailbox -ResultSize unlimited -Database <Mailbox Server\Database Name>  | where {  (  $_.UseDatabaseQuotaDefaults -eq $false) }

Thursday, June 18, 2009

Exchange 2007 DR Training

Last week i have attended 3 day Exchange 2007 DR training. It was level 300 training and was delivered by one of MS Exchange PFE Pelin Taldilal (i think i misspelled her last name). This course was designed after getting feedbacks and inputs from lots of MS PFEs all around the world. This is a new course and as per my information its was first time delivered in ME Region. The course contains lots of excellent information on Exchange DR configuration such as CCR,SCR and SCC. This course was offered as part of Microsoft premier customer agreement. I will post some blogs on exchange DR in the future covering information which i learned from this training.

Monday, June 1, 2009

Exchange Mailbox Movement – BlackBerry issue

Last week i faced a strange issue, we are facing some space issue on one volume so i draft a strategy to move selective mailboxes from one database to another database located in another storage group, on the weekend i ran one batch of users and moved them to another database. All goes fine. Next day was a working day and i got some complains that users are not able to sync and use their blackberry devices. Initially i thought that it is some other issue but after investigation i found that these are the same users which i have moved on weekend. After some search i found that Blackberry has some problem when we move mailboxes between storage groups in different databases on same server. It seems that blackberry services are not aware or are not updating itself for reflecting the database change. Although as per some articles the mailbox movements between servers is not an issues only within the same server has but i haven't tested it.  By following the instructions on Blackberry support site i have restarted the Blackberry Enterprise service and the result was as per the expectation the problem goes away. I think Blackberry has to work on this glitch and should fix it in the next release or in the next service pack.

Saturday, May 30, 2009

Downloadable contents for Office SharePoint Server 2007

Microsoft is providing lots of books, white papers and articles on MOSS configuration and deployment for free. We as a MOSS consultant use these resources in most of the projects as a baseline for architecture. Below link contains a complete list of all downloadable contents available on MOSS, this list is continuously updating by Microsoft for covering new versions and service packs;

http://technet.microsoft.com/en-us/library/cc262788.aspx

Friday, May 29, 2009

Public Folder Mail Enabling issue

Last week i faced an issue. whenever i mail enable any public folder and then double clicked it in exchange management console for setting email address, i am getting following error

“The mail proxy for this folder can not be found. This may be due to replication delays. The mail enabled pages will not be shown.”

After some time following event is logged in the event viewer;

Event Type: Warning
Event Source: MSExchangeIS
Event Category: General
Event ID: 9543
Date: XXXX
Time: XXXX
User: N/A
Computer: XXXX
Description:
Unable to create Public Folder proxy object for folder "XXXX" in the Active Directory.


After some search i found one KB (http://support.microsoft.com/kb/327841) suggesting following fix;

“This issue may occur if the Microsoft Exchange System Attendant service is not set to start under the local system account.”

I checked System attended service and found that it is configured under local system account which is a correct configuration. After lots of search i found nothing and all searches are directing towards the same article.

Because all peoples are pointing towards the same system attended service so i thought why shouldn’t i restart the service and see. I restarted the service and then again checked one recently mail enabled folder but the issue is same then i mail disabled it and then re-enabled it and guess what the issue gone! i it seems that there was some issue and system attended service is not communicating properly with active directory which has been solved after restarting the service.

Citrix Session Slowness

Recently i faced a very strange issues regarding Citrix sessions. Users are complaining that they are getting very slow response whenever they open Citrix website from web interface.  After initial analysis it has been noted that there is almost 3 minutes delay in displaying web interface page after successful authentication. After further analysis and also getting help from Citrix support it has been found that there is no reverse DNS zone entry in DNS servers for Citrix severs subnet. Because the environment is new and the application which is facing problem is the first application, so the issue has not been identified before. After entering Citrix Servers Subnet in reverse lookup zone the performance is dramatically increased and the web interface page is now opening in seconds.

As per Citrix support “You have a DNS resolution issue on the WI server just when the client machine send the login information to WI, the WI box does a DNS query to 10.201.X.X which fails for X.X.201.10.in-addr.arpa. after several DNS queries exchanges with different DNS servers, a NetBios call succeed to return 10.201.X.X and then the Citrix XML communication starts.”  (They have also told us to disable SNMP which was not enabled because we are not using it)

Following tests has been conducted in order to narrow down this issues;

1. Network trace on the workstation.

2. Network trace on the XML broker server.

3. Network trace on the web interface server.

4. CDF trace on below modules on XML broker server:

IMA_Subsystems_ComSrv

IMA_Subsystems_MfServer

IMA_Sals_MfServer

MF_XMLRelay_Admin

MF_XMLRelay_Wpnbr

5. CDF trace on below modules on Zone Data collector server :

IMA_Subsystems_UserWin

IMA_Subsystems_ComApp

IMA_Subsystems_ComSrv

IMA_Subsystems_MfServer

MF_DLL_Ccticket

IMA_Subsystems_MfApp

IMA_Subsystems_User

IMA_Sals_MfServer

IMA_Sals_User

IMA_Sals_UserWin

IMA_RunTime_DynamicStore


For CDF tracing CDF Control Application is required which can be downloaded from following link;

http://support.citrix.com/article/ctx111961

Wednesday, May 27, 2009

MCTS (Exchange 2007 Configuration) passed

Yesterday i cleared my MCTS exchange 2007 Configuration exam. The Exam was properly designed and most answers required experience and hands-on. Preparation of any exam always give you an overview of the complete product and normally one gets to now the features which he normally ignored in day to day operations.

For this exam preparation i used following items;

1. MS self paced guide.

2. Virtualized Exchange 2007 Environment.

3. TechNet Exchange Articles.

4. Practice Tests.

MS self paced guide are very well written and normally it gives you 70% preparation rest is your practical experience and TechNet research.

Thursday, May 21, 2009

Edge server Configured as Regional or Remote Site Mail relay server

I have one of the requirements from my regional Admins to allow mail relay for their regions. Mostly they want mail relay for;

1.local exchange or SMTP servers.

2. Printers and scanners wants to send emails

3. Devices and Application servers wants to send alert notifications.

4. Some of the devices and servers only support Anonymous permissions settings.

In order to provide this functionality, i can create a site specific receive connector on HUB and allow only their specific server IPs to allow relay emails, but there is a problem, i don't have any control on their site and server security and allowing relay directly to HUB server means their communication is directly terminating to our Enterprise/Business zone which is a high security risk. I thought why shouldn’t i use my edge servers sitting in DMZ zone and allow relay from them? .  I have checked connectivity of these sites from DMZ and found that i can reach them. I was researching on it and had also discussed it with one of my friends (Nicolas Blank, an expert in exchange configuration and migration) he also agreed on my idea and had guided me to following article

http://www.msexchange.org/articles_tutorials/exchange-server-2007/security-message-hygiene/using-exchange-2007-edge-server-mail-relay-exchange-2003-organization-part1.html

After reading this article i am now more confident about this configuration, I think that in a scenario where we don't have any control on remote site security and we have a demand to open anonymous security then its better to open relay on edge servers rather then on HUB servers.

Active Directory Schema Modification Documentation

I was working on one project and wants to get some details regarding AD schema, luckily i found following link contains plethora of information about AD schema and also discussing how Microsoft itself is managing their schema, check it out;

http://technet.microsoft.com/en-us/library/bb687810.aspx

Monday, May 18, 2009

Exchange Public Folder information

I was researching on some public folder stuff and luckily found a very good Microsoft TechNet article on same. check out the link;

http://technet.microsoft.com/en-us/library/bb124684(EXCHG.65).aspx

Sunday, May 17, 2009

Sending Emails from external ids to Exchange Public folder

If you want to enable external emails (hotmail, yahoo etc) to public folders then you have to make sure that anonymous permissions on PF is set to contributor. vice versa if you want to disable external emails to any PF then you have to set anonymous permissions on any PF to none.

Tuesday, May 5, 2009

Monday, May 4, 2009

Outlook Troubleshooting

Most of the time we face lot of complains that users are not able to access their emails on outlook or exchange is not responding, in most of the cases client's outlook has some problem and users don't realize it. Following are some of the steps which will be handy in troubleshooting these types of issues and also narrow downing the problem scope;

Test 1 : Testing OWA:

1. Get the troubled user user id and password and test from OWA or ask him to open his mailbox via OWA.

2 . or create a test Mail account and Access OWA from it to verify that Exchange is working fine and user is able to access their emails.

If OWA is working fine then we have to concentrate on Client side troubleshooting else we have to look at the server side and check CAS servers and ISA severs (If reverse proxy is in use) (i will discuss server side troubleshooting in my next blog).

Test 2: Deleting Addins Registry Keys:

1. Logon to a troubled user machine.

2. Navigate to the following registry key:

HKEY_LOCAL_MACHINE\SOFTWARE\Microsoft\Office\Outlook\Addins
HKEY_CURRENT_USER\Software\Microsoft\Office\Outlook\Addins
HKEY_LOCAL_MACHINE\Software\Microsoft\Exchange\Client\Extensions (If it exists)
HKEY_CURRENT_USER\Software\Microsoft\Exchange\Client\Extensions (If it exists)

3. Export the keys (for backup purpose), right click each subkey and click Delete.


Test 3: Configure Selected Startup:

1. Go to Run and type msconfig.

2. Select Selective Startup in General Tab.

3. Click to clear Process SYSTEM.INI file, Process WIN.INI File and Load Startup Items.

4. Click tab Services and select option Hide All Microsoft Services, and click button Disable All and click OK

5. Restart computer.

Test 4: Check if issue is occurring in Cached Mode:

Create a Outlook profile with Exchange cached mode and then test.

Test 5 : Check if issue is occurring in Online Mode:

Change Outlook profile in online mode, and open Outlook again and then test.

Test 6: Configure outlook profile for using RPC over HTTP:

1. Open outlook profile configuration and select Connections Tab

2. In the outlook Anywhere selection check connect to Ms exchange using HTTP.

3. Enter OWA address in exchange URL text box.

4. Assuming that user is sitting in a LAN environment, select “On Slow networks, Connect using HTTP first, then connect using TCP/IP.

5. Select Proxy server authentication settings based on your exchange server configuration.

6. Click OK.

7. Close Outlook completely. verify that there is no outlook.exe process visible in task manager.

8. Launch outlook again.

9. Hold control and press right click on outlook icon in system tray.

10. Click on connection status and verify that all connections are established by using HTTPS protocol not TCP/IP protocol.

Test outlook by sending and receiving emails. If this works then it means there might be some TCP/IP (RPC) communication problem between your client and server. You have to involve your network team and verify that if there is any network device causing issue or playing with the TCP/IP settings or TCP/IP packets.

Citrix Protocol Driver Error

Today i faced a very complex problem. My Clients were complaining that they are are getting Citrix Protocol Driver Error. After initial troubleshooting i found that there were some http errors on my web interface servers. I restarted IIS on WIS but no luck. I restarted IMA service on Presentations servers but issue still remained same. It was strange that i am getting this error for all Applications published on different servers this means that this error is not server dependent.  i have tried Citrix article http://support.citrix.com/article/CTX106531 published on same issue and also tried disabling Session reliability http://support.citrix.com/article/CTX108439 but no luck. My Citrix environment consists of 2 Access gateway servers, 2 Web interface servers, 4 presentation servers and 1 license servers and we are using Netscaler device for load balancing. For narrowing issue i have disabled one web interface server from Load balancer and configured application to use only one presentation server but it didn’t solved the problem. I also restarted whole farm but no luck. Then i focused on Access gateway appliance and removed 1 appliance from Load balancing but issue remained same after that i enabled 1st device in Load balancing and removed second device from load balancing then after test i found that the issue is not occurring again and it is solved. I then logged on to the the troubled access gateway and found that this sever is not able to connect to the license server also this server is not configured to accept connections on port 80 only https. i am not sure why the sessions are not going to the other Access gateway which have correct configuration. I have to still fixed the licensing server connection issue but till now i haven't got any complain from the user.

Thursday, April 30, 2009

My Wordpress Blog


I am now very annoyed with blogger and now decided to setup my wordpress tech blog also. Wordpress has more features and have awesome templates. From now onwards i will publish all my tech blogs on both wordpress and blogger.  following is my wordpress tech blog address

http://khurramullah.wordpress.com

Powershell Command for public folder permissions


If you want to replicate all permissions which parent public folder have to all child PFs, then you need to run following powershell script

adduserstopfrecursive.ps1 -toppublicfolder "<Parent Public Folder Name" -user "<User or group name>" -permissions –<permissions>

for example:

adduserstopfrecursive.ps1 -toppublicfolder "\SALES" -user "PFOwners" -permissions owner

Sunday, April 12, 2009

BlackBerry Permissions Configuration on Exchange 2007

If you are planning to install Blackberry services in your environment then you have to consider permissions required by BB on Exchange setup.

BB required following set of rights in order to perform operations on user mailboxes;

1. Send-As permissions on user mailboxes.

2. Receive-As permissions on mailboxes.

3. Ms-Exch-Store-Admin permissions.

You have to provide the above permissions to blackberry service accounts; following is the method for doing this;

Step one:

Provide View only Admin rights to BlackBerry Service Account

get-mailboxserver <mail_server_name> | add-exchangeadministrator BESAdmin –role ViewOnlyAdmin

Step Two:

Provide Send-As, Receive-As and MS-Exch-Store-Admin to BlackBerry service Account.

get-mailboxserver <mail_server_name> | add-adpermission –user BESAdmin –accessrights ExtendedRight –extendedrights Send-As, Receive-As, ms-Exch-Store-Admin

Wednesday, April 8, 2009

Microsoft Exchange Server Build numbers and release dates

Following is the list of all exchange server versions released by Microsoft with their build numbers and release dates for reference,

Version

Build Number

Release Date

Microsoft Exchange Server  4.0                    

4.0.837                 

Apr-96

Microsoft Exchange Server  4.0 (a)                

4.0.993                 

Aug-96

Microsoft Exchange Server  4.0 SP1                

4.0.838                 

May-96

Microsoft Exchange Server  4.0 SP2                

4.0.993                 

Aug-96

Microsoft Exchange Server  4.0 SP3                

4.0.994                 

Nov-96

Microsoft Exchange Server  4.0 SP4                

4.0.995                 

Apr-97

Microsoft Exchange Server  4.0 SP5                

4.0.996                 

May-98


Microsoft Exchange Server  5.0                    

5.0.1457                

Mar-97

Microsoft Exchange Server  5.0 SP1                

5.0.1458                

Jun-97

Microsoft Exchange Server  5.0 SP2                

5.0.1460                

Feb-98


Microsoft Exchange Server  5.5                    

5.5.1960                

Nov-97

Microsoft Exchange Server  5.5 SP1                

5.5.2232                

Jul-98

Microsoft Exchange Server  5.5 SP2                

5.5.2448                

Dec-98

Microsoft Exchange Server  5.5 SP3                

5.5.2650                

Sep-99

Microsoft Exchange Server  5.5 SP4                

5.5.2653                

Nov-00


Microsoft Exchange 2000 Server                    

6.0.4417                

Oct-00

Microsoft Exchange 2000 Server (a)                

6.0.4417                

Jan-01

Microsoft Exchange 2000 Server SP1                

6.0.4712                

Jul-01

Microsoft Exchange 2000 Server SP2                

6.0.5762                

Dec-01

Microsoft Exchange 2000 Server SP3                

6.0.6249                

Aug-02

Microsoft Exchange 2000 Server post-SP3           

6.0.6487                

Sep-03

Microsoft Exchange 2000 Server post-SP3           

6.0.6556                

Apr-04

Microsoft Exchange 2000 Server post-SP3           

6.0.6603                

Aug-04


Microsoft Exchange Server  2003                   

6.5.6944                

Oct-03

Microsoft Exchange Server  2003 SP1               

6.5.7226                

May-04

Microsoft Exchange Server  2003 SP2               

6.5.7638                

Oct-05


Microsoft Exchange Server  2007                   

8.0.685.24 or 8.0.685.25

Dec-06

Microsoft Exchange Server  2007 SP1               

8.1.0240.006            

Nov-07

*Source Microsoft TechNet

Shrinking SQL 2000, 2005 Databases


If you ever run in a situation like you have only MBs of space left on production SQL servers and your transaction logs are growing bigger and bigger and you want to claim disk space immediately then you might need to run following command

Backup log <Database name> with no_log

This command is not recommended to run in normal circumstances and after this you are not able to recover your database point in time. if you have proper backups configured then you don't need to run this command because after each full backup the transaction logs are automatically truncated. Also in case you have log shipping configured then this command will break your log shipping sequences. Only use if you don't have any space left on physical disk and you don't have any other alternatives available.

if you don't required point in time recovery then change your database recovery model to ‘Simple’ doing this will ensure that your transaction log will not get bigger.

The above command will not reclaim disk space, you have to run DBCC shrink statement or go to the SQL management studio and manually shrink log file.

Wednesday, March 4, 2009

Granting Permissions on Mailboxes using Power shell

If you have some accounts which needs to have full access permission on lots of mailboxes then following power shell command is for you. In order to use this command you have to perform below steps;

1. Create one csv file name it users.csv and save it to C:\ drive.

2. Type text name in first line. Please make sure that there is no space or any other special character after text name otherwise the command will not run.

3. Copy all user ids on which you want to add permissions after text name in same column.

4. Open Exchange Management Shell and type following command and press enter;

Import-CSV "C:\users.csv" | ForEach{Add-MailboxPermission –ID $_.name –AccessRights FullAccess –User [Account id]}

Replace [Account id] with the account id which you want to grant full access permissions on mailboxes.

for verifying that the permissions has been granted, Run following command;

Import-CSV "C:\users.csv" | ForEach{Get-MailboxPermission –ID $_.name –User [Account id}

You can add more columns in you text file if you want by using comma ‘,’ and can reference it in the command as same as you are referencing the first column.

If you don’t have aliases or Ids and have only display names and these display names are in last name first name format such as smith, john then you have to add your names in your .csv file like this “smith, john”

if you want to do opposite and wants to add full access permission for lots users on one mailbox then following will be your command

Import-Csv c:\users.csv | foreach {Add-MailboxPermission –Identity [Account Id] -User $_.users -Accessright Fullaccess -InheritanceType all}

Replace [Account Id] with the mailbox alias or name.

Saturday, February 14, 2009

Exchange 2007 Basics

Exchange 2007 environment consists of following basic components;

1. CAS (Client Access Servers).

2. HUB servers.

3. Mail Box servers.

4. Edge Servers.

5. Unified Messaging servers

I will Explain basic functions of each server role in my upcoming blogs so stay tuned ;).